> For the complete documentation index, see [llms.txt](https://docs.globo.io/llms.txt). Markdown versions of documentation pages are available by appending `.md` to page URLs; this page is available as [Markdown](https://docs.globo.io/globo-b2b-bulk-order/quick-order-form/create-a-form.md).

# Create a Quick Order form

Build a Quick Order form, choose its products, save it and add it to a page of your online store.

A Quick Order form is a product table where buyers search, enter quantities and add many items to the cart at once. You build the form in Globo B2B Bulk Order, then add it to a page with a block in your theme editor. This page takes you from a new form to a working form on your storefront.

## Before you start

* Turn on the **Globo Bulk Order** app embed in your theme. Without it, no form appears on your storefront. See [Enable the app embed](/globo-b2b-bulk-order/getting-started/enable-app-embed.md). You can also check it during the theme editor step below.
* Decide which page will show the form. The steps below create a new page, for example "Quick order", with its own page template. You can also use your home page.

## Create and publish the form

{% stepper %}
{% step %}

### Open Quick Order and create a form

1. In Shopify admin, go to **Apps** > **Globo B2B Bulk Order**.
2. In the app navigation, click **Quick Order**. The **Quick Order Form** page opens.
3. Click **Create form**. If you have no forms yet, the button is in the middle of the page, under **Create your first quick order form**.

The form editor opens in a full-screen window.

You can also start from the app's Dashboard: in **Bulk order tools**, click **Create form** on the **Quick Order** card.
{% endstep %}

{% step %}

### Name the form

In the name field at the top of the editor, replace **Quick Order Form** with a name you'll recognize, for example "Wholesale quick order". The name only appears in the app. Buyers don't see it.

The rest of the editor:

* **Left sidebar:** three tabs, **Products**, **Customize** and **Visibility**. The editor opens on **Products**.
* **Top bar:** next to the name, a menu switches the preview between **Desktop view** and **Mobile view**. The **Active** | **Draft** buttons set the status. New forms start as **Active**.
* **Preview:** a live preview of the form. It updates as you change settings, before you save.

Shopify's save bar, with **Save** and **Discard**, sits at the top of the window. For a new form it shows from the start, so you can save at any time.
{% endstep %}

{% step %}

### Choose the products

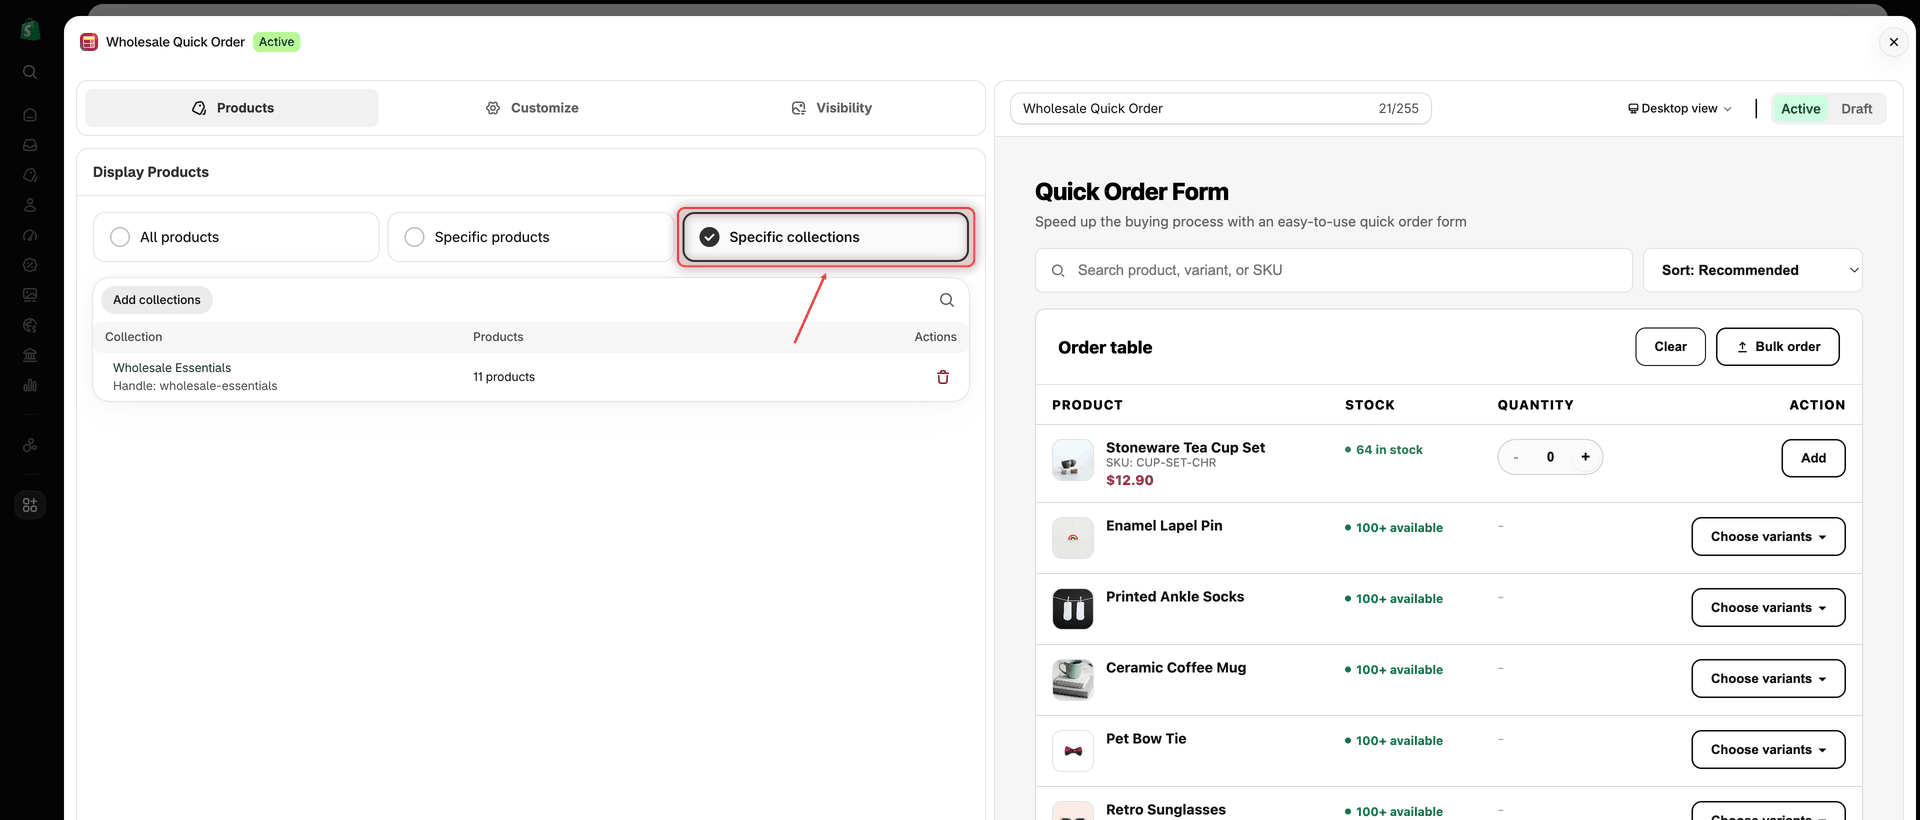
On the **Products** tab (headed **Display Products**), click one of the three cards:

| Card                            | What the form lists                                                                                                                                                                                                                  |
| ------------------------------- | ------------------------------------------------------------------------------------------------------------------------------------------------------------------------------------------------------------------------------------ |
| **All products**                | Every product that's visible on your online store. The editor shows **All products in your store will be displayed in this form.**                                                                                                   |
| **Specific products** (default) | Only the products you pick.                                                                                                                                                                                                          |
| **Specific collections**        | All products in the collections you pick. Products you add to those collections later appear in the form automatically. With two or more collections, buyers also get a collection menu above the table, set to **All collections**. |

**If you chose Specific products:**

* Click **Add products** to open Shopify's product picker. Tick the products you want, then confirm. You pick whole products, so every variant of a product appears in the form. The picker opens with your current products already ticked. Your confirmed selection replaces the list.
* Or click **Add from collection** and choose one collection. A window lists its products. Tick the ones you want and click **Add products**, or click **Add all products** to add the whole collection. These products are added to your list once. Products added to the collection later don't join the form. Use **Specific collections** for that.
* To find a product in the list, click the search icon and type a title or SKU. To remove a product, click its trash icon.

For example, add **Classic Crew Tee**, **Lightweight Zip Jacket**, **Ceramic Coffee Mug** and **Enamel Lapel Pin**.

**If you chose Specific collections:** click **Add collections**, tick one or more collections in Shopify's picker, then confirm. For example, pick **Wholesale Essentials**. The list shows each collection's handle and number of products.

If you switch to another card, the editor keeps your picks. They come back when you switch back.

<figure><img src="https://4205698016-files.gitbook.io/~/files/v0/b/gitbook-x-prod.appspot.com/o/spaces%2FcOPpR31lfLzPdPWnPtOU%2Fuploads%2Fgit-blob-c96650813c387841e3688b810e36d0680525f246%2Fscreenshot-quick-order-builder-products.png?alt=media" alt="Quick Order form editor with the Products tab open, Specific collections selected and the Wholesale Essentials collection in the list, next to the live preview of the form"><figcaption><p>Choose which products appear in the form on the Products tab.</p></figcaption></figure>

{% hint style="warning" %}
A new form starts on **Specific products** with no products. If you save without adding any, you see **Select at least one product**. With **Specific collections** and none picked, you see **Select at least one collection**.
{% endhint %}
{% endstep %}

{% step %}

### Review the Customize tab

Click **Customize**. Its sections, from top to bottom, are **Header**, **Search & sort**, **File upload order**, **Table columns**, **Pagination**, **Style** and **Custom CSS**.

The defaults give you a working form, so you can leave this tab as it is for now:

* The title **Quick Order Form** and the description **Speed up the buying process with an easy-to-use quick order form** appear above the table. Change them under **Header** > **Title text** and **Description**.
* A search box and a sort menu are on.
* The table shows the **Product**, **Stock**, **Quantity** and **Action** columns, 20 products per page.
* File upload and pasting a SKU list are off.

To change any of this, see [Customize the form](/globo-b2b-bulk-order/quick-order-form/customize-the-form.md). To add the **Bulk order** button, see [Let buyers upload an order file](/globo-b2b-bulk-order/quick-order-form/upload-an-order-file.md) and [Let buyers paste a SKU list](/globo-b2b-bulk-order/quick-order-form/paste-a-sku-list.md).
{% endstep %}

{% step %}

### Check the Visibility tab

Click **Visibility** and check two settings:

* **Display location:** **Landing page** is ticked by default. It covers your home page and other pages of your theme, such as pages you create in **Online Store** > **Pages**. If you'll add the form to a product or collection page, also tick **Product page** or **Collection page**. Otherwise the form stays empty there.
* **Customer visibility:** **Who can see this form?** is set to **All customers**. To show the form only to B2B buyers, choose **Logged-in customers only**, or choose **Customers with tags** and add at least one tag, for example `wholesale`, under **Include customer tags**.

For every option, see [Choose who sees the form and where](/globo-b2b-bulk-order/quick-order-form/visibility.md).
{% endstep %}

{% step %}

### Save the form

1. In the top bar, keep **Active** selected. Choose **Draft** instead if you aren't ready for buyers to see the form.
2. Click **Save** in the save bar.

A **Form created** message appears. Later saves show **Form updated**.

If a setting is missing, a red **Fix errors to save** banner above the preview lists what to fix, for example **Add at least one customer tag** or **Name can't be blank**. Fix each item, then click **Save** again.
{% endstep %}

{% step %}

### Copy the embed code

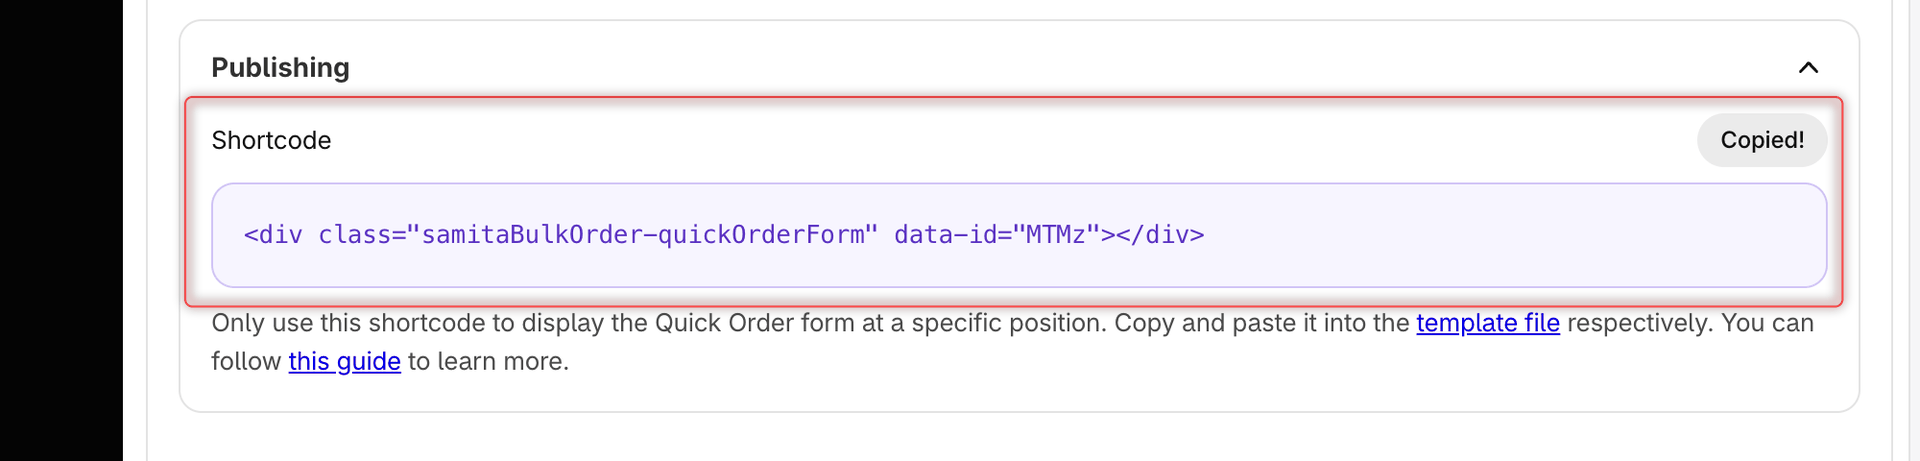
1. On the **Visibility** tab, scroll to **Publishing**.
2. Next to **Shortcode**, click **Copy**. The button briefly changes to **Copied!**.

The code looks like this. The `data-id` value is different for every form, so always copy it from the app:

```html
<div class="samitaBulkOrder-quickOrderForm" data-id="MTIzNA=="></div>
```

Before the first save, the box shows **Save the form to generate a shortcode.** and **Copy** is disabled. You can also copy the code later from the **Shortcode** column on the **Quick Order Form** list.

<figure><img src="https://4205698016-files.gitbook.io/~/files/v0/b/gitbook-x-prod.appspot.com/o/spaces%2FcOPpR31lfLzPdPWnPtOU%2Fuploads%2Fgit-blob-830e58afe441aab8fef81bcfdedebfbded9fe31d%2Fscreenshot-quick-order-visibility-publishing.png?alt=media" alt="Publishing section of the Visibility tab in the Quick Order form editor, showing the form&#x27;s embed code and the Copy button next to Shortcode, which reads Copied! after a click"><figcaption><p>Copy the form's embed code from the Publishing section after you save.</p></figcaption></figure>

When you've copied the code, close the form editor window. Your form is saved.
{% endstep %}

{% step %}

### Add the form block in the theme editor

1. In Shopify admin, go to **Online Store** > **Themes**. On your current theme, click **Customize**.
2. In the theme editor's left sidebar, click the **App embeds** icon. Check that **Globo Bulk Order** is turned on. If it isn't, turn it on.
3. Create a page template for the form. In the page menu at the top of the editor, choose **Pages** > **Create template**. Name it, for example `quick-order`, base it on **Default page**, and click **Create template**. The editor opens the new template. A separate template keeps the form off your other pages, such as About us or Contact.
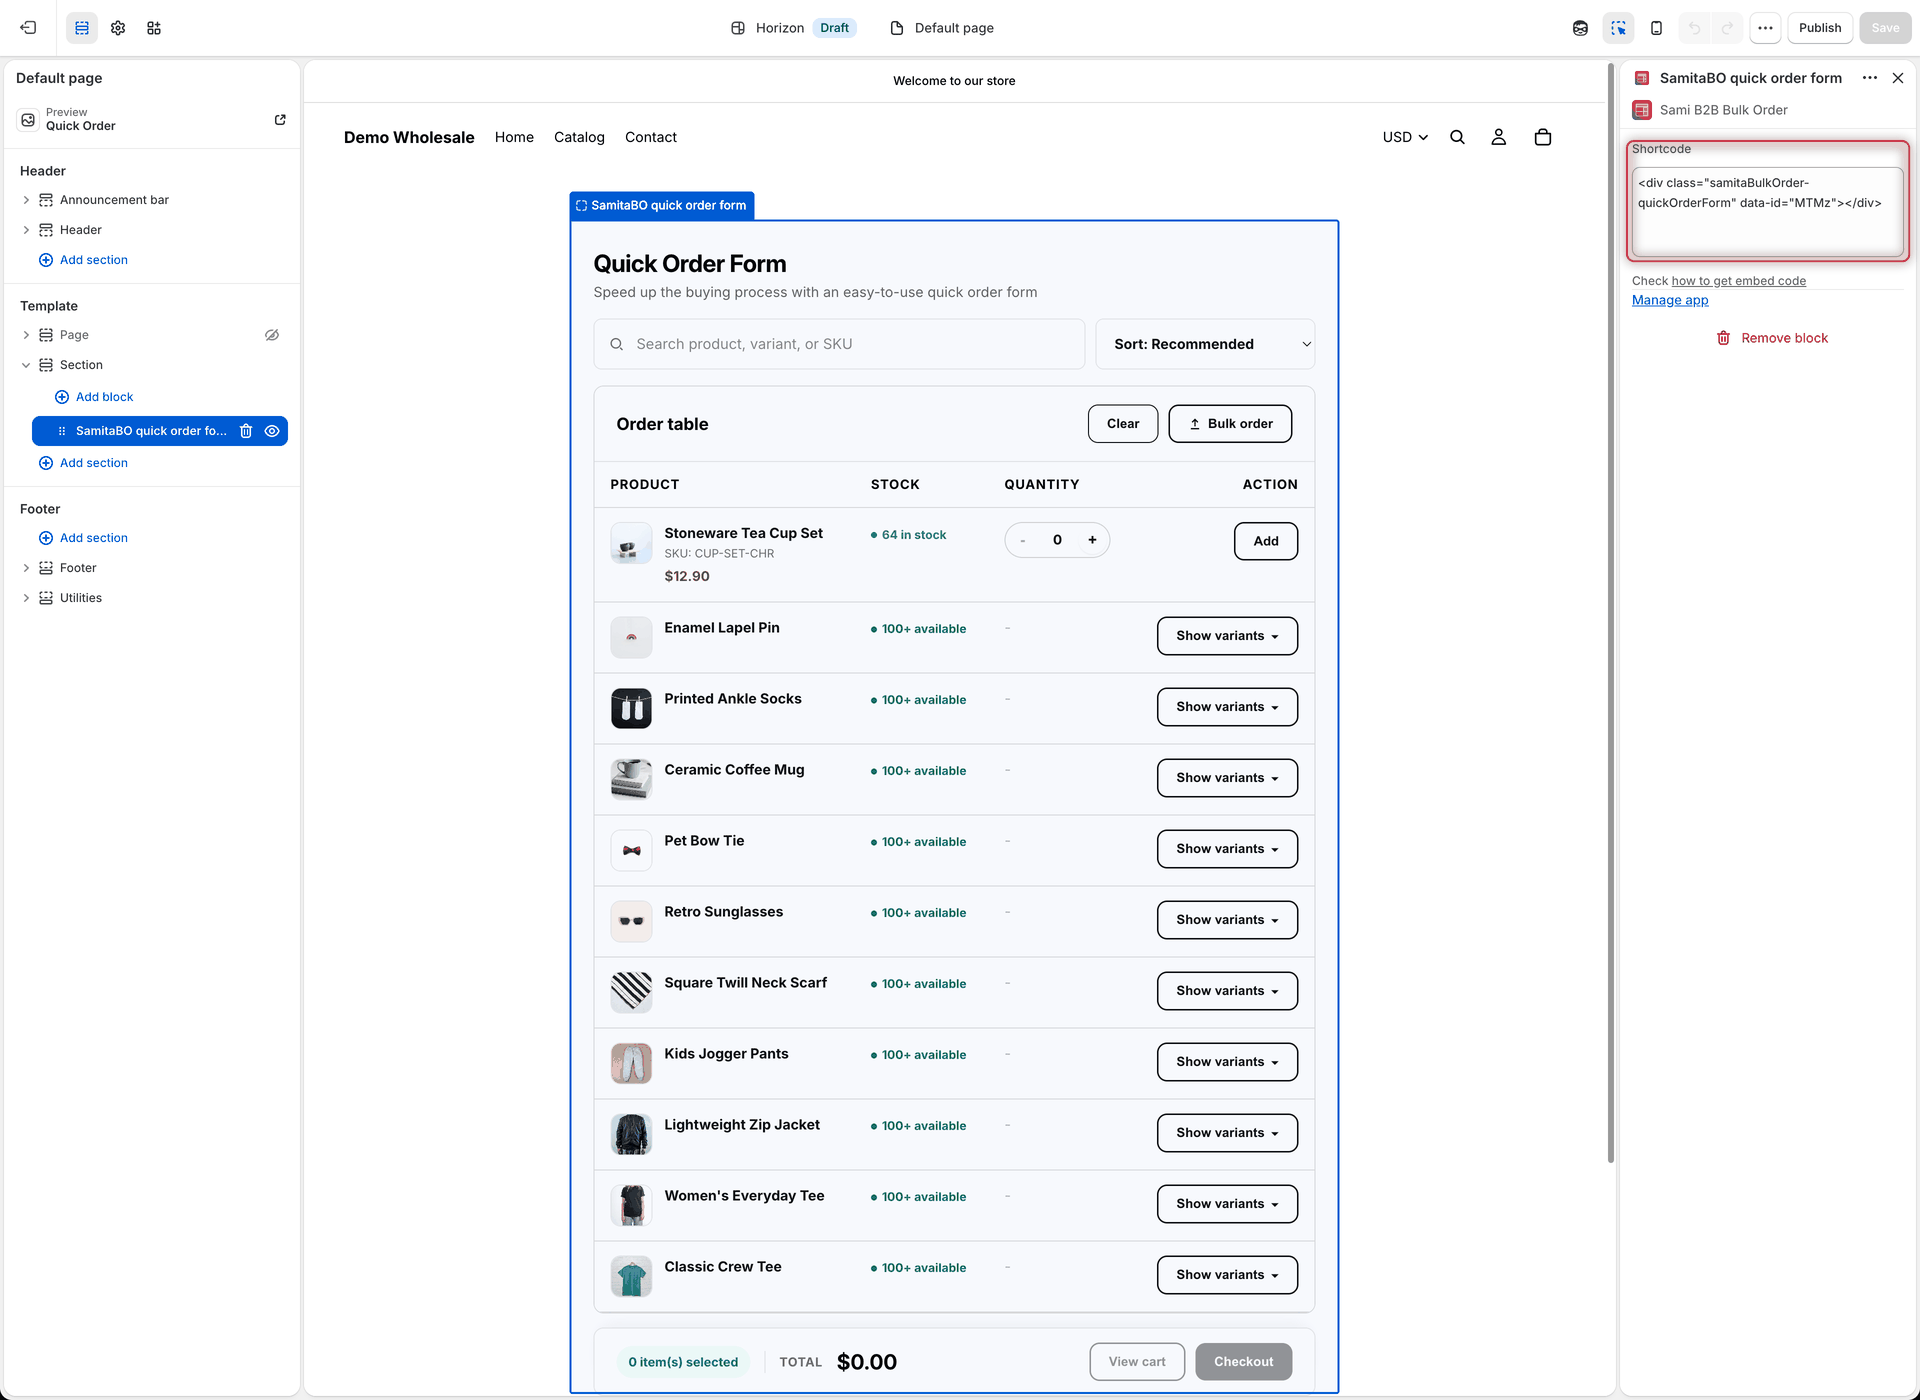
4. In the sidebar, click **Add section**. Under **Apps**, choose **GloboBO quick order form**.
5. Click the new block. In its **Shortcode** setting, delete the default code and paste the code you copied. The default code has an empty `data-id`, so on its own it shows nothing.
6. Click **Save**.

To show the form on your home page instead, skip step 3: choose **Home page** in the page menu, do steps 4 to 6, and skip the next step.

<figure><img src="https://4205698016-files.gitbook.io/~/files/v0/b/gitbook-x-prod.appspot.com/o/spaces%2FcOPpR31lfLzPdPWnPtOU%2Fuploads%2Fgit-blob-3c4826261f86a61217a75221ed6bfa720807826d%2Fscreenshot-theme-editor-quick-order-block.png?alt=media" alt="Shopify theme editor with the GloboBO quick order form block selected and the form&#x27;s embed code pasted into its Shortcode setting"><figcaption><p>Paste the embed code into the block's Shortcode setting, then save the theme.</p></figcaption></figure>
{% endstep %}

{% step %}

### Create the page

1. In Shopify admin, go to **Online Store** > **Pages** and click **Add page**. To use a page you already have, open it instead.
2. Enter a title, for example "Quick order".
3. Under **Theme template**, choose the template you created, for example `quick-order`.
4. Click **Save**.

Every page that uses this template shows the form. To learn more about templates, see [Shopify's guide to templates](https://help.shopify.com/en/manual/online-store/themes/theme-structure/templates). To help buyers find the page, add it to your store's menu. See [Shopify's guide to menus](https://help.shopify.com/en/manual/online-store/menus-and-links).
{% endstep %}

{% step %}

### Check the form on your storefront

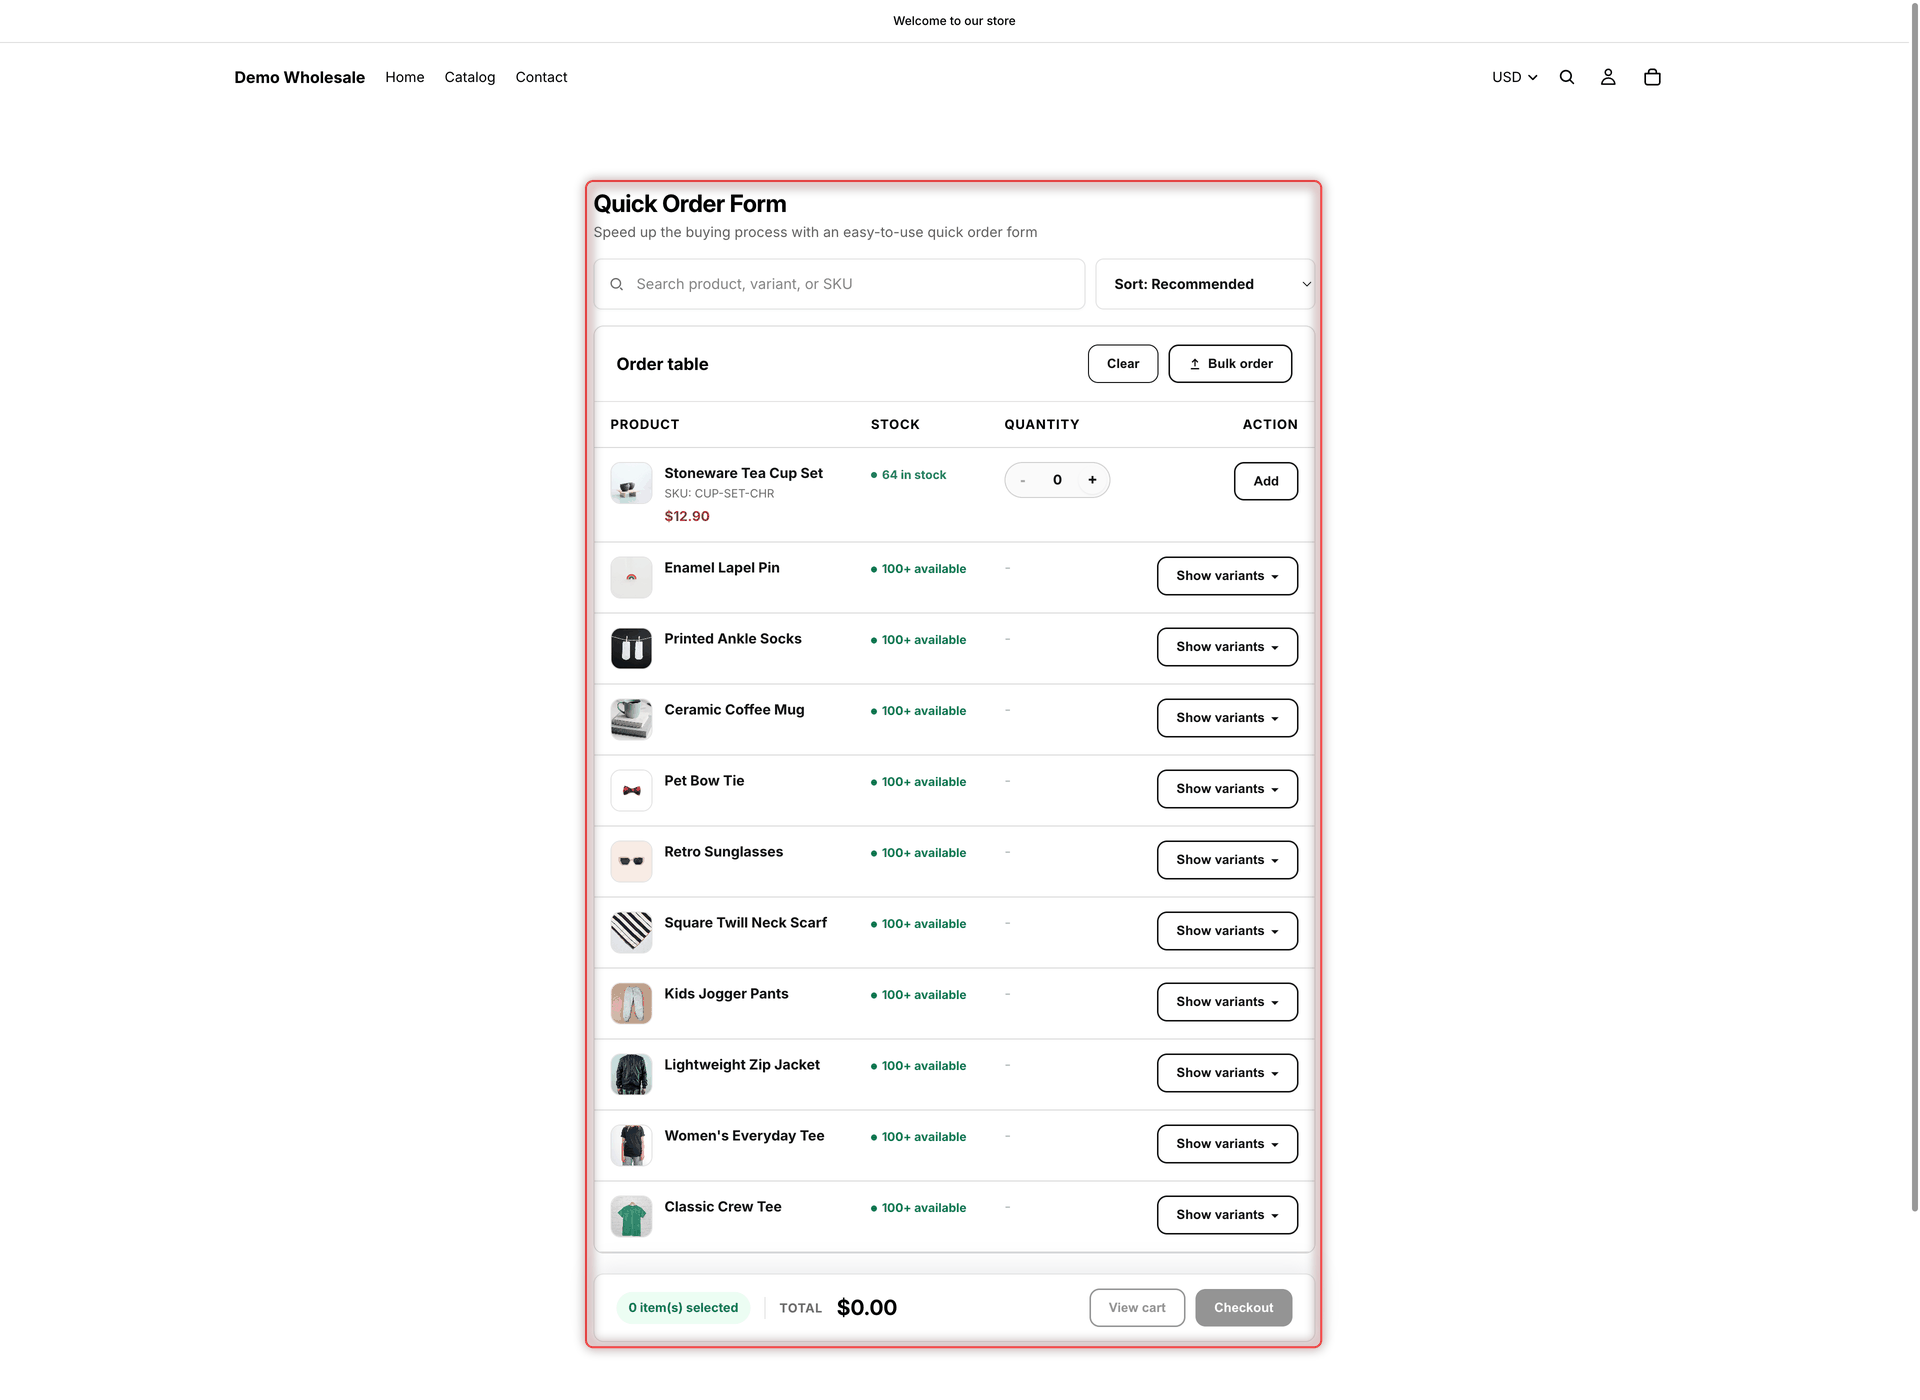
Open the page on your online store, for example `your-store.com/pages/quick-order`. You should see:

* the title and description
* a search box (**Search product, variant, or SKU**) and a sort menu
* the **Order table** with your products and a **Clear** button
* a footer bar with the number of items in the cart (for example **0 item(s) selected**), the cart **Total**, **View cart** and **Checkout**

Products with several variants show a **Show variants** button that opens their variant rows. To test the form, enter a quantity next to a product or variant and click **Add**. A message confirms the item was added, and the footer updates. **Clear** empties the whole cart, including items that weren't added with the form.

If you limited the form to logged-in or tagged customers, log in as a matching customer first. Changes reach your storefront shortly after you save. If you don't see them, reload the page.

<figure><img src="https://4205698016-files.gitbook.io/~/files/v0/b/gitbook-x-prod.appspot.com/o/spaces%2FcOPpR31lfLzPdPWnPtOU%2Fuploads%2Fgit-blob-fcdfe8fe4367e2b27535879f5573297147f30001%2Fscreenshot-storefront-quick-order-form.png?alt=media" alt="A Quick Order form on a storefront page, with a search box, a sort menu, Clear and Bulk order buttons, product rows with Show variants buttons, one product row with a quantity box and an Add button, and a footer with Total, View cart and Checkout"><figcaption><p>The finished Quick Order form on the storefront; this example also has file upload turned on, which adds the Bulk order button.</p></figcaption></figure>

{% hint style="info" %}
Storefront labels such as **Show variants**, **Add** and **Checkout** come from **Settings** > **Translations**. The preview in the form editor always uses the app's built-in English labels, so some wording can differ. For example, the preview shows **Choose variants**.
{% endhint %}
{% endstep %}
{% endstepper %}

{% hint style="warning" %}
**Form not showing?** Check that the **Globo Bulk Order** app embed is on and the form is **Active**. Make sure the block has your form's code, not the empty default. Check that **Display location** includes this type of page, and that you're logged in as a customer who matches **Customer visibility**. See [The Quick Order form doesn't appear on the page](/globo-b2b-bulk-order/help/troubleshooting.md#the-quick-order-form-doesnt-appear-on-the-page) for more.
{% endhint %}

## Active and Draft forms

| Status     | On your storefront                                                                                                                   |
| ---------- | ------------------------------------------------------------------------------------------------------------------------------------ |
| **Active** | The form appears wherever you placed its code, to the buyers allowed on the **Visibility** tab.                                      |
| **Draft**  | The form shows nothing, even where its code is placed. Use it while you build a form, or to take a form offline without deleting it. |

In the editor, a change to **Active** or **Draft** takes effect when you click **Save**. On the **Quick Order Form** list, the **Status** switch saves right away.

## Other ways to place the form

* **Paste the code into a theme file.** If you edit your theme's code, paste the embed code into the template file where the form should appear. In Shopify admin, go to **Online Store** > **Themes**, then click **…** > **Edit code** on your theme. The **Globo Bulk Order** app embed must still be on.
* **Header or footer.** You can also add the **GloboBO quick order form** block to your theme's header or footer. Use **Display location** to control which pages then show it.
* **More than one form.** You can place several forms on the same page. Each form keeps its own settings and style. Custom CSS is the exception: it applies to the whole page, so it can change the other forms there too.

## Next steps

* [Customize the form](/globo-b2b-bulk-order/quick-order-form/customize-the-form.md)
* [Choose who sees the form and where](/globo-b2b-bulk-order/quick-order-form/visibility.md)
* [Let buyers upload an order file](/globo-b2b-bulk-order/quick-order-form/upload-an-order-file.md)
* [Let buyers paste a SKU list](/globo-b2b-bulk-order/quick-order-form/paste-a-sku-list.md)