> For the complete documentation index, see [llms.txt](https://docs.globo.io/llms.txt). Markdown versions of documentation pages are available by appending `.md` to page URLs; this page is available as [Markdown](https://docs.globo.io/globo-mega-menu/manage-menus/schedule-menus-and-items.md).
# Schedule Menus and Items
Show a menu or a single item only between a start and end date.
Scheduling lets you prepare content in advance and have it appear and disappear by itself. You can schedule:
* **A whole menu**, for example a *Black Friday* menu that replaces your regular menu for one weekend.
* **A single menu item**, for example a *Flash Sale* link that shows only while the sale runs.
## Schedule a Whole Menu
{% hint style="info" %}
Scheduling a whole menu is available on the **Pro Navigation** plan. On other plans, the **Schedule publishing** checkbox is disabled with the note *This option is only available to PRO plan*.
{% endhint %}
{% stepper %}
{% step %}
### Open the Publish dialog
In the menu editor, click **Save** if you have unsaved changes, then click **Publish** in the top-right corner. You can also click **Publish** on a draft menu's row in [Menu Manager](/globo-mega-menu/manage-menus/menu-manager.md).
{% endstep %}
{% step %}
### Choose the theme
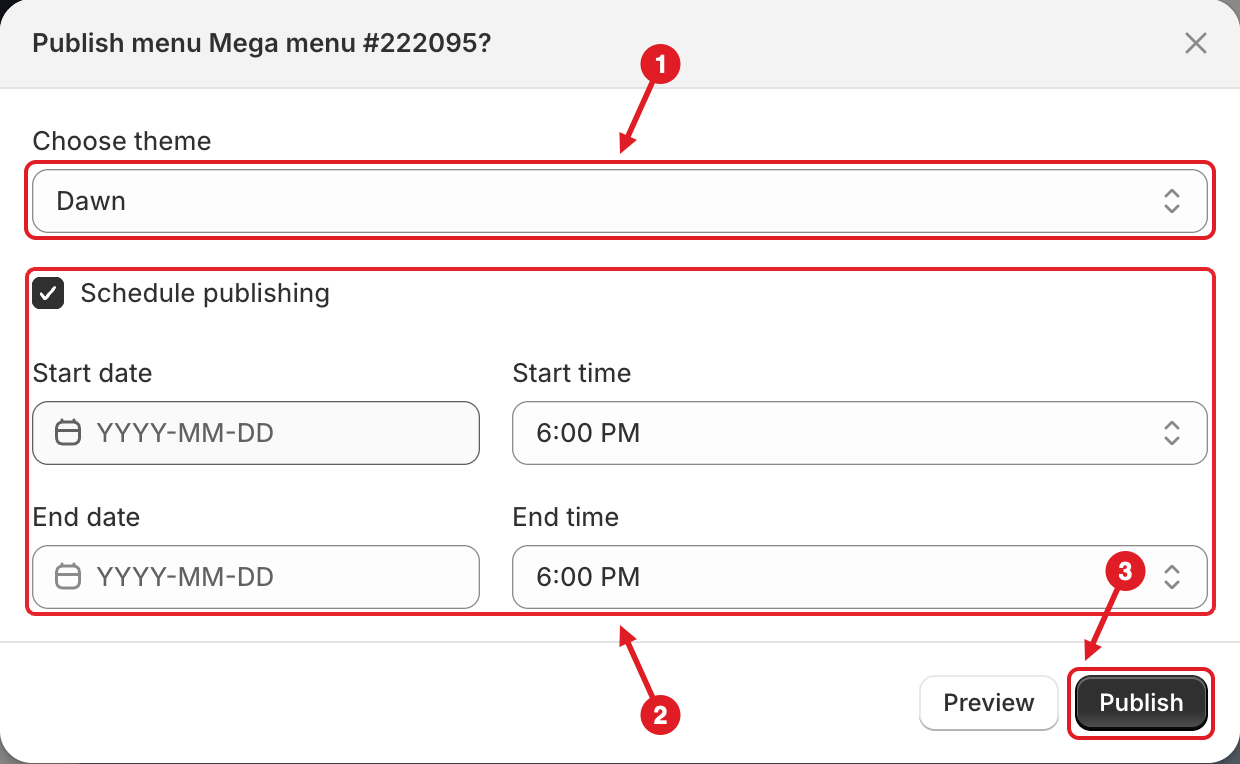
Under **Choose theme (1)**, select the theme the menu should appear on. Your live theme is marked **(Live theme)**.
{% endstep %}
{% step %}
### Set the dates
Tick **Schedule publishing (2)**, then fill in one or both pairs of fields:
| Field | What it does |
| ------------------------------- | ------------------------------------------------------------------------------------------------ |
| **Start date** / **Start time** | When the menu starts showing. Leave the start date empty to show it from the moment you publish. |
| **End date** / **End time** | When the menu stops showing. Leave the end date empty to keep it live with no end. |
Dates use the `YYYY-MM-DD` format. You pick times from a list in 30-minute steps, and past times are greyed out. All times use your store's time zone (**Settings** > **General** in Shopify admin).
(1) Choose theme, (2) Schedule publishing with start and end, (3) Publish
{% endstep %}
{% step %}
### Publish
Click **Publish (3)**. The menu becomes **Active**, and a calendar icon appears next to its badge in Menu manager. Hover over the icon to see **Publish on:** and **Unpublish on:**.
{% endstep %}
{% endstepper %}
### Rules and error messages
| Message | What to do |
| --------------------------------------------------------------------- | --------------------------------------------- |
| *You must set at least one of publish from or publish to* | Fill in at least a start date or an end date. |
| *Start date must be in the future* / *End date must be in the future* | Pick a date and time later than now. |
| *Publish from must be before publish to* | Make the start earlier than the end. |
### Change or remove a schedule
* **Change the dates:** open the menu, click **Publish** and edit the dates. The dialog shows the current schedule. Click **Publish** again.
* **Remove the schedule but keep the menu live:** open the Publish dialog, untick **Schedule publishing** and click **Publish**.
* **Take the menu down now:** click **Disable**. This also clears the schedule.
{% hint style="warning" %}
**After the end date, the menu is hidden, but it isn't disabled.** In Menu manager it still shows as **Active** until you **Disable** it. If another active menu is set up for the same place, that menu shows instead. See [Which Menu Is Shown?](/globo-mega-menu/manage-menus/multiple-menus-and-campaigns.md)
{% endhint %}
{% hint style="success" %}
**Campaign tip:** keep your regular menu active with no schedule, and publish the campaign menu with a start and end date. During the campaign the scheduled menu wins, and afterwards the regular menu comes back on its own. See [Multiple Menus and Campaigns](/globo-mega-menu/manage-menus/multiple-menus-and-campaigns.md).
{% endhint %}
## Schedule a Single Item
{% stepper %}
{% step %}
### Open the item
In the menu editor, click the item in the **Elements** tab (or click the pencil icon on it in the preview). **Edit Item** opens.
{% endstep %}
{% step %}
### Turn on Schedule publishing
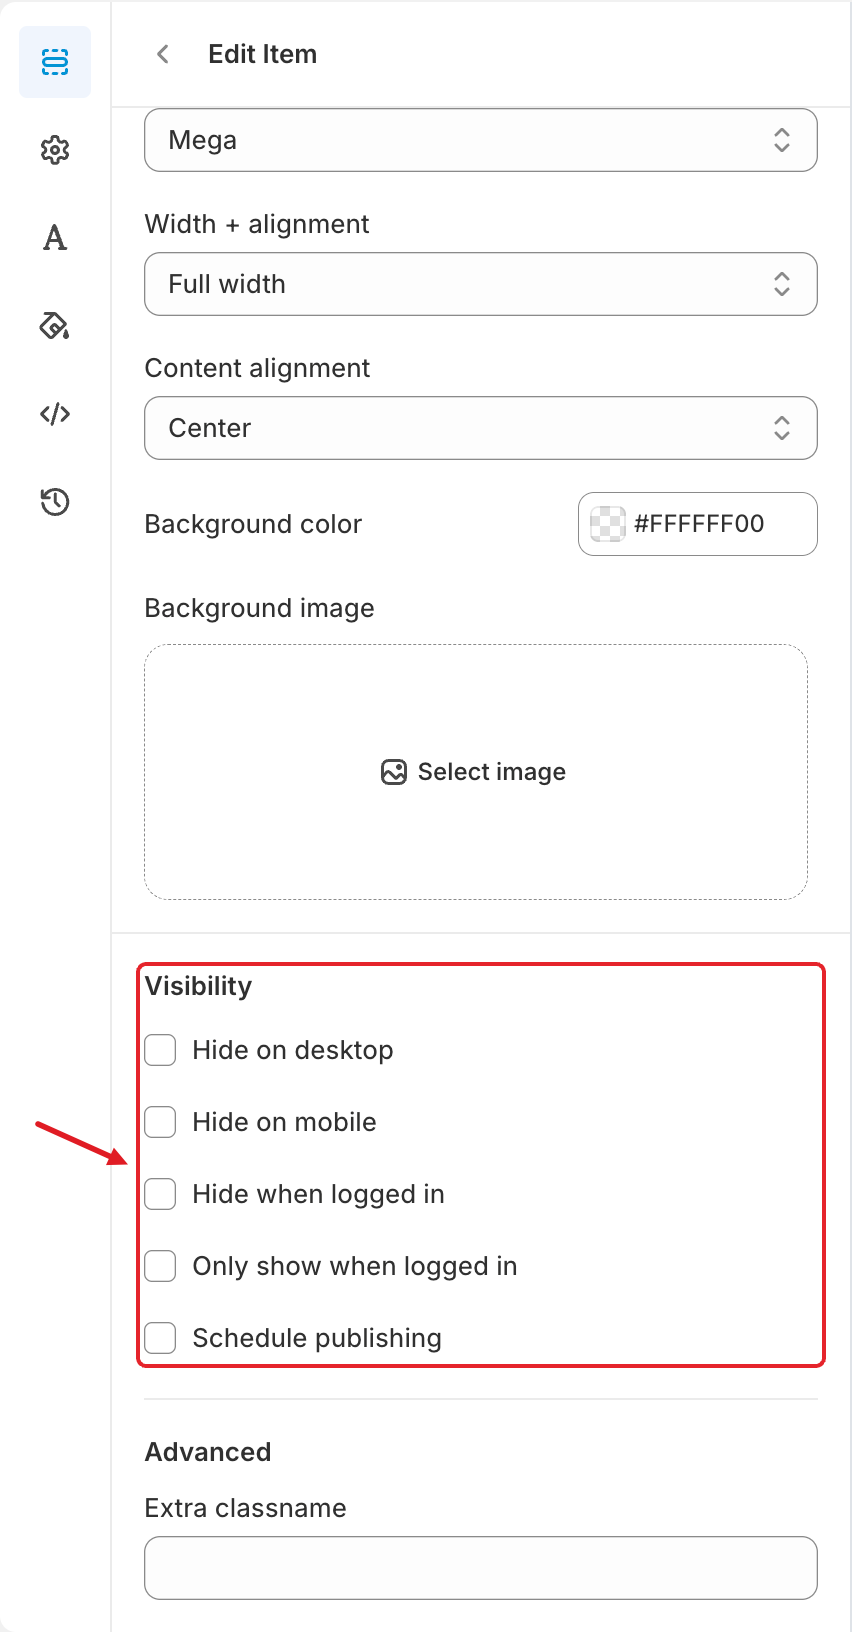
Scroll down to **Visibility** and tick **Schedule publishing**. Set the **Start date / Start time** and/or the **End date / End time**. The end must be in the future and after the start.
Visibility options in Edit Item
{% endstep %}
{% step %}
### Save and publish
Click **Save**, then **Publish** again so the storefront gets the change.
{% endstep %}
{% endstepper %}
The **Visibility** section also has other options you can combine with a schedule:
| Option | Effect on the storefront |
| ---------------------------- | ------------------------------------------------------------------------------------ |
| **Hide on desktop** | The item doesn't show on the desktop menu. |
| **Hide on mobile** | The item doesn't show on the mobile menu. |
| **Hide when logged in** | The item shows only to visitors who aren't logged in (for example a *Sign up* link). |
| **Only show when logged in** | The item shows only to logged-in customers. |
***
### Related Articles
{% content-ref url="/pages/ae5iAailCwvlkNqFtWrN" %}
[Multiple Menus and Campaigns](/globo-mega-menu/manage-menus/multiple-menus-and-campaigns.md)
{% endcontent-ref %}
{% content-ref url="/pages/GicujsB7qcB0s3MYM7JU" %}
[Publish New Menu to Theme](/globo-mega-menu/basic-knowledge/publish-new-menu-to-theme.md)
{% endcontent-ref %}
{% content-ref url="/pages/juoC3naBGncW8PAmEsCr" %}
[Edit Menu Item](/globo-mega-menu/manage-menu-items/modify-main-menu-item.md)
{% endcontent-ref %}
***
**💬 Need help?**
Email us at **📧** [**contact@globo.io**](mailto:contact@globo.io) - we’re happy to assist!