> For the complete documentation index, see [llms.txt](https://docs.globo.io/llms.txt). Markdown versions of documentation pages are available by appending `.md` to page URLs; this page is available as [Markdown](https://docs.globo.io/options/point-of-sale/set-up-and-use.md).

# Set up and use options in POS

Publish an option set to POS, add the app to the POS home screen, and fill in options at the counter.

## Before you start

* Point of Sale is included in your plan. See [Compare plans](/options/plans-and-billing/compare-plans.md).
* You have the Shopify POS app, signed in to your store.
* You have read [POS limitations](/options/point-of-sale/limitations.md). Two option types and one add-on mode do not work in POS.

## Set up

{% stepper %}
{% step %}

### Publish the option set to Point of Sale

Open the option set in the builder and select **Point of Sale** under **Sales channels**, beside the option set's name. Save.

An option set published only to **Online Store** does not appear in POS.
{% endstep %}

{% step %}

### Check the option set is Active

A **Draft** option set does not run on any channel.
{% endstep %}

{% step %}

### Review the option types it uses

If the option set contains [Dimension](/options/option-types/input-types/dimension.md) or [Product links](/options/option-types/selection-types/product-links.md), those options do not work in POS. Either remove them, or create a separate option set for POS without them.
{% endstep %}

{% step %}

### Review the add-on modes

Any value using **Fixed amount** is not charged in POS. Change those values to **Existing product** or **New product**. See [Add-on pricing](/options/add-on-pricing/add-on-pricing.md).
{% endstep %}

{% step %}

### Add the app tile to the POS home screen

In the Shopify POS app, customize the home screen and add a tile for the app, so staff can open it in one tap.

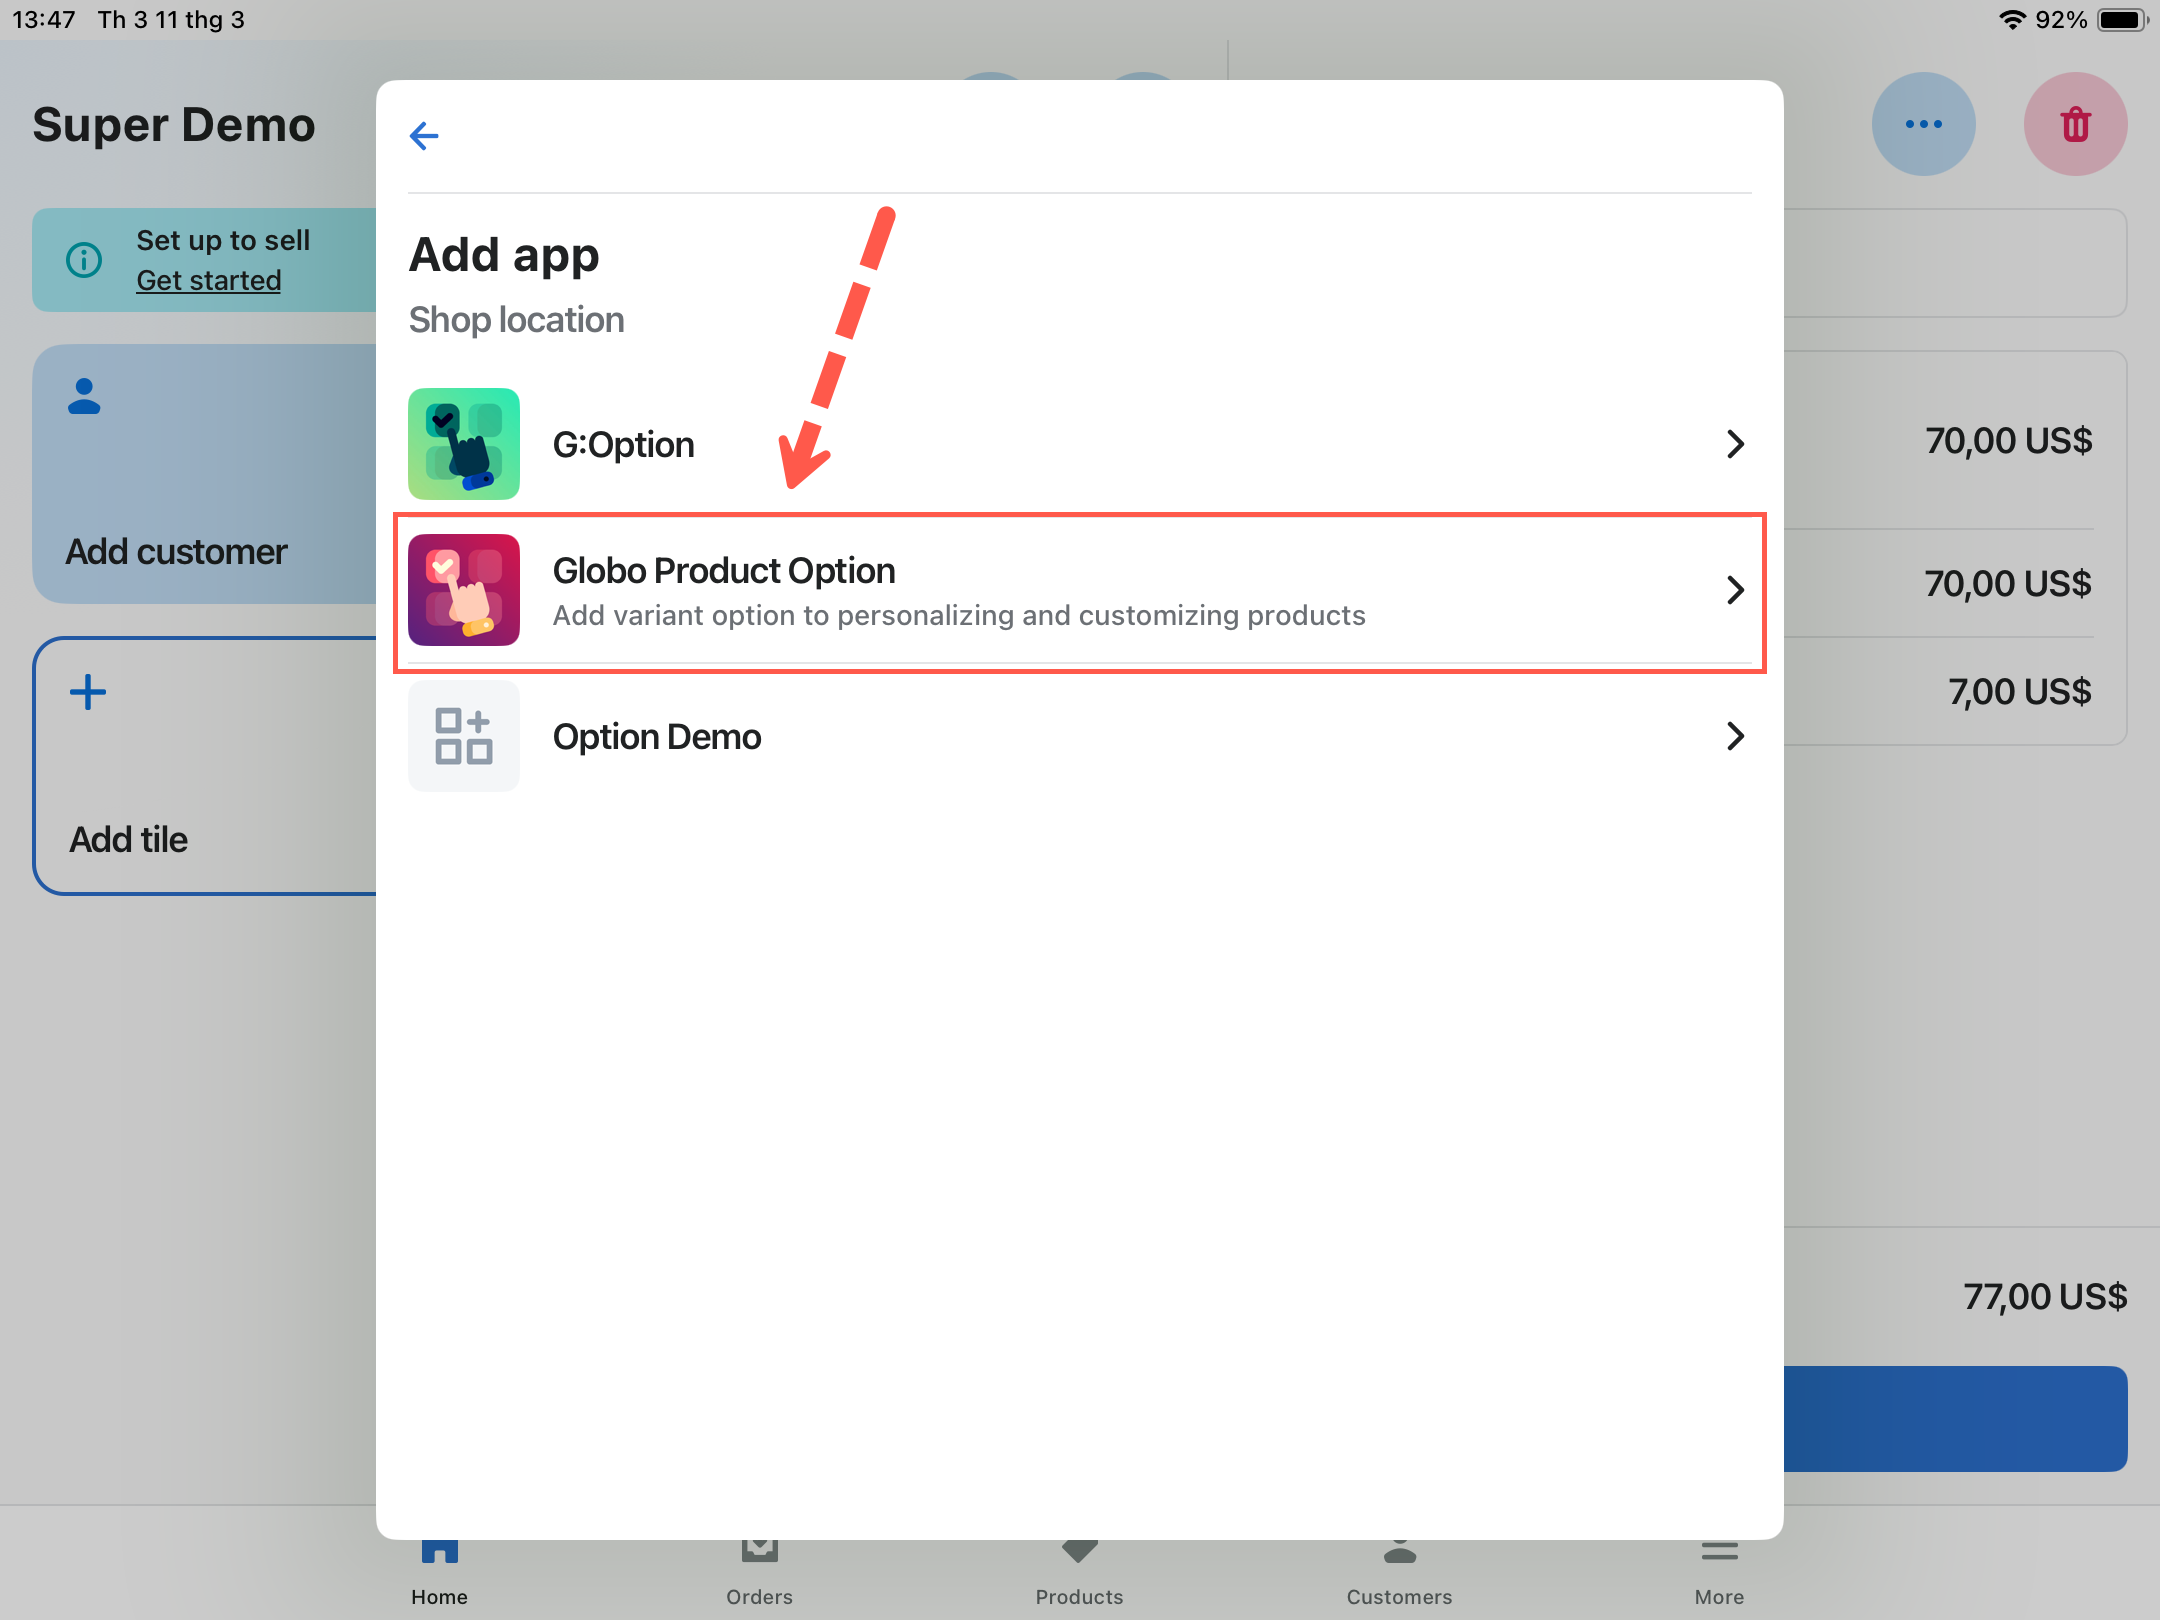
On the POS smart grid, tap **Add tile**, then tap **App**.

<figure><img src="https://3141646361-files.gitbook.io/~/files/v0/b/gitbook-x-prod.appspot.com/o/spaces%2FkMyxhAk2ZlJa4wZQGfBI%2Fuploads%2Fgit-blob-a5774ba0373a9feec054193a6e10adc1020225b8%2Fscreenshot-pos-add-tile.png?alt=media" alt="The Add tile panel open in Shopify POS with App highlighted in the list of tile types"><figcaption><p>Tap Add tile on the smart grid, then tap App.</p></figcaption></figure>

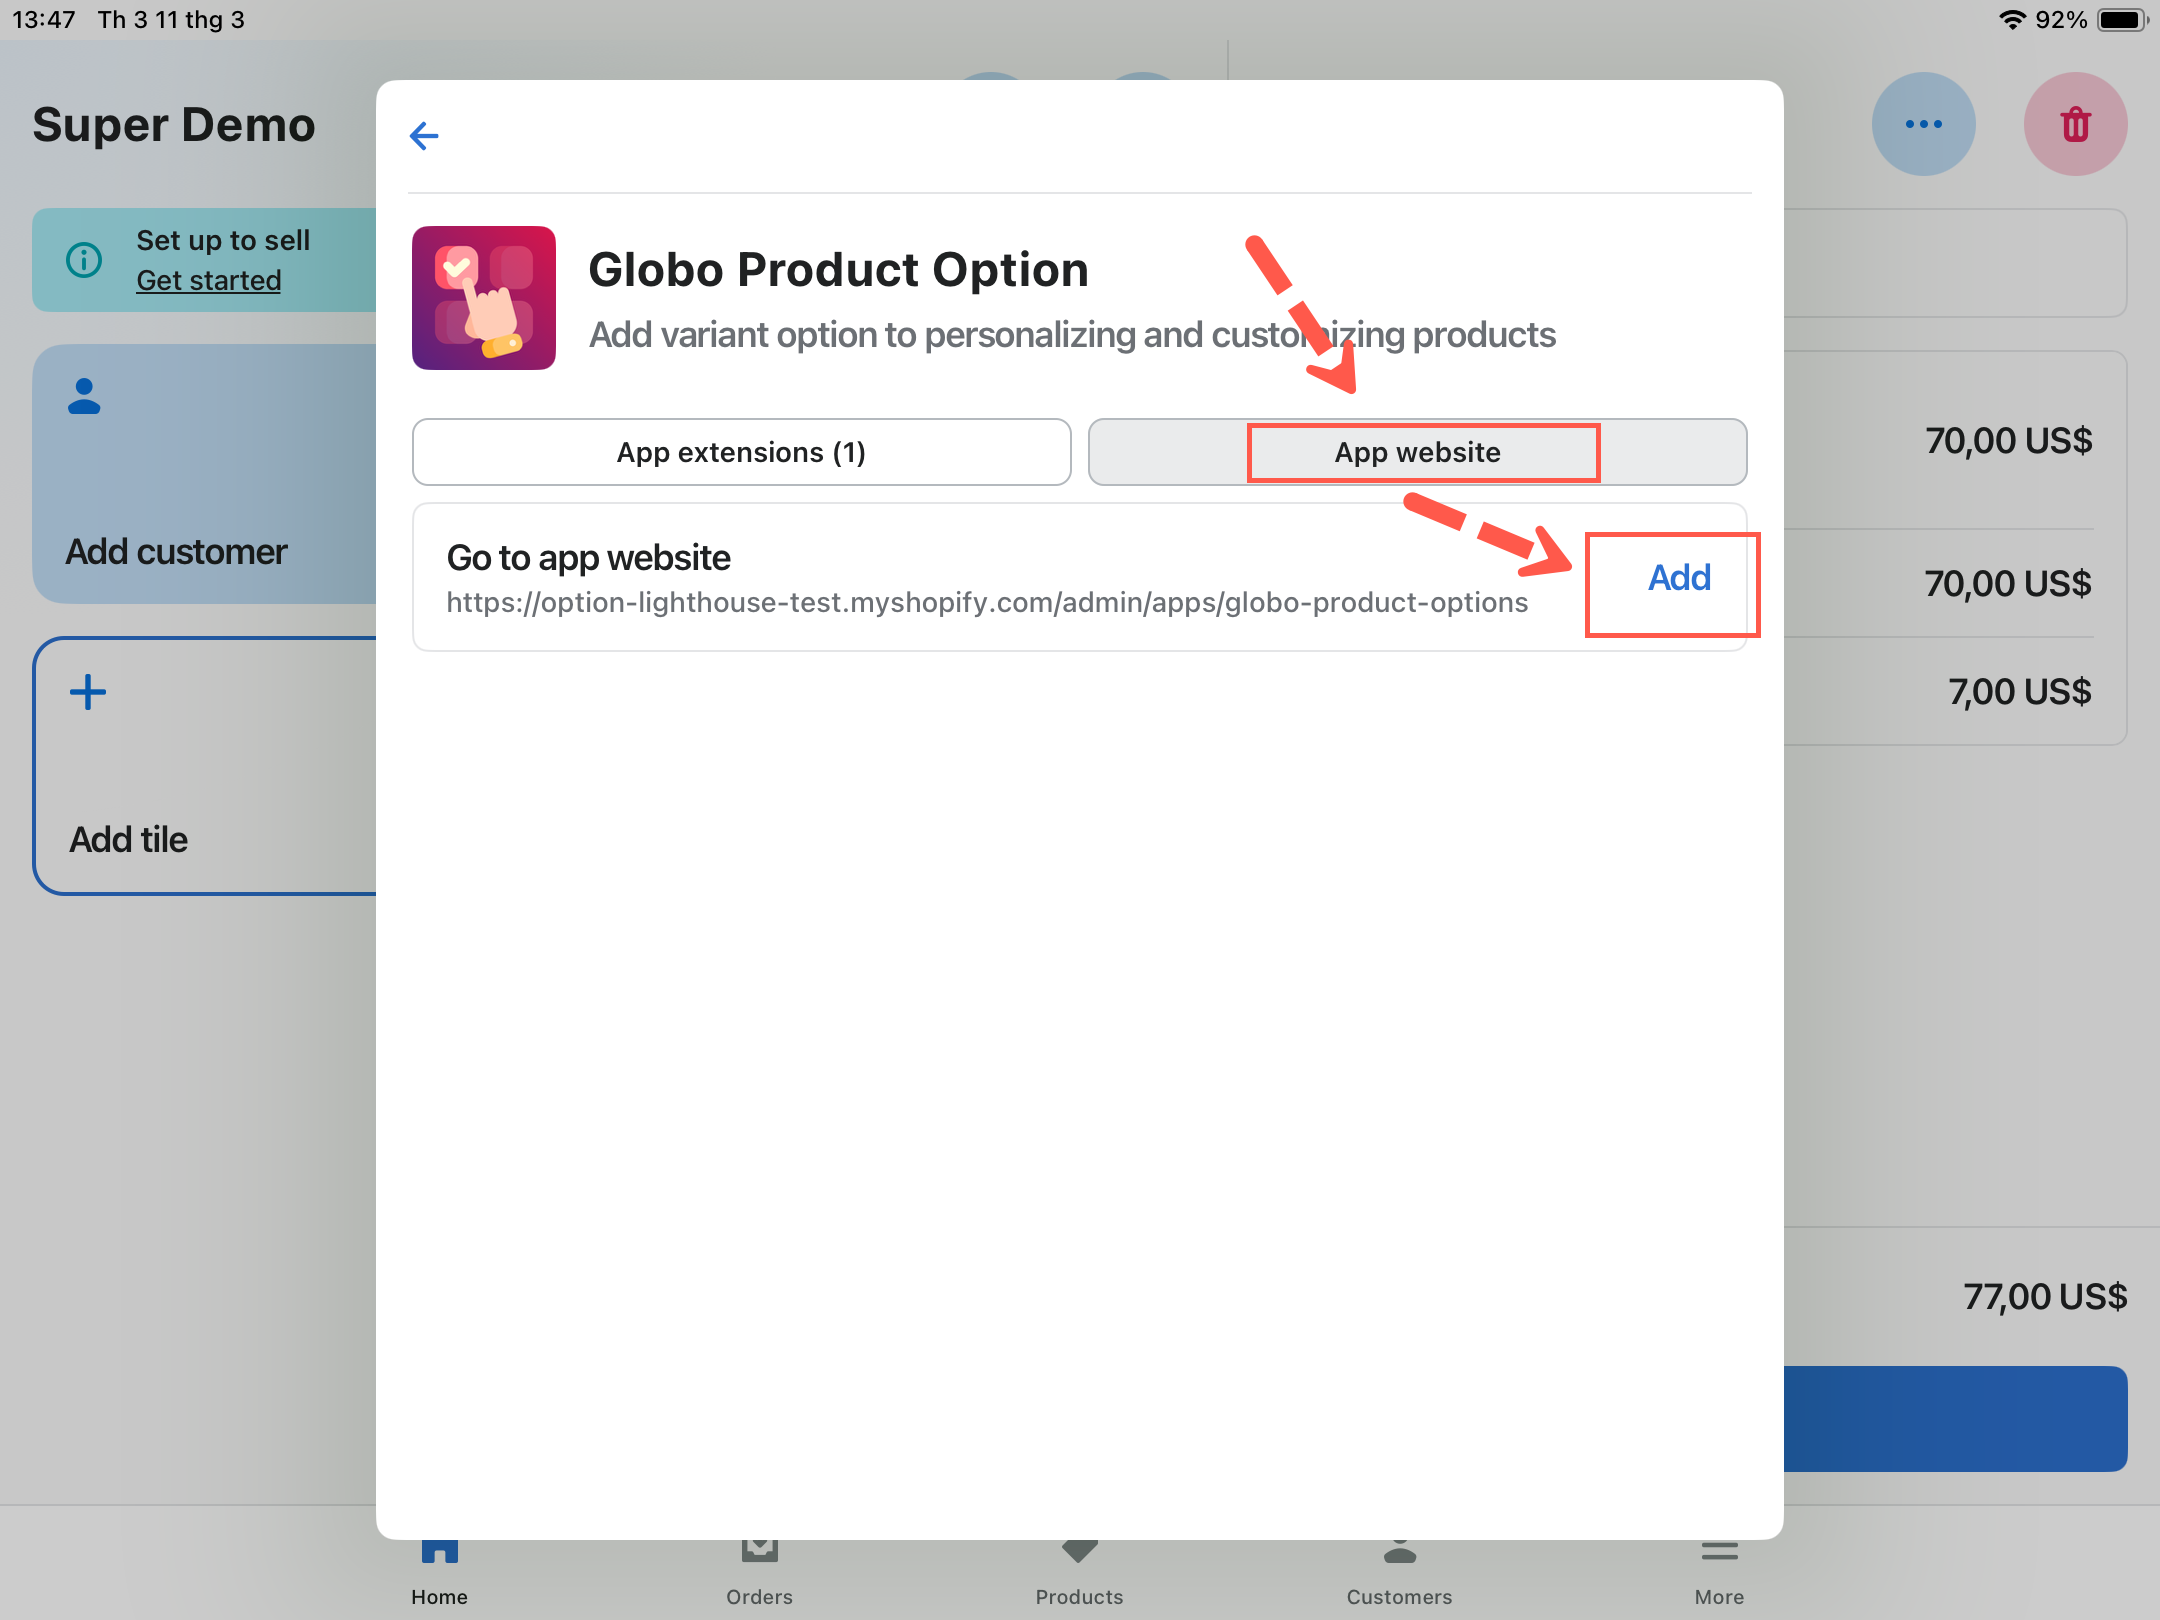
Select **Globo Product Options, Variant**.

<figure><img src="https://3141646361-files.gitbook.io/~/files/v0/b/gitbook-x-prod.appspot.com/o/spaces%2FkMyxhAk2ZlJa4wZQGfBI%2Fuploads%2Fgit-blob-693d8033eed57d4ee4146e263dd029d2e25c6cea%2Fscreenshot-pos-add-app.png?alt=media" alt="The Add app panel in Shopify POS with Globo Product Option highlighted"><figcaption><p>Select the app from the list of apps installed on your store.</p></figcaption></figure>

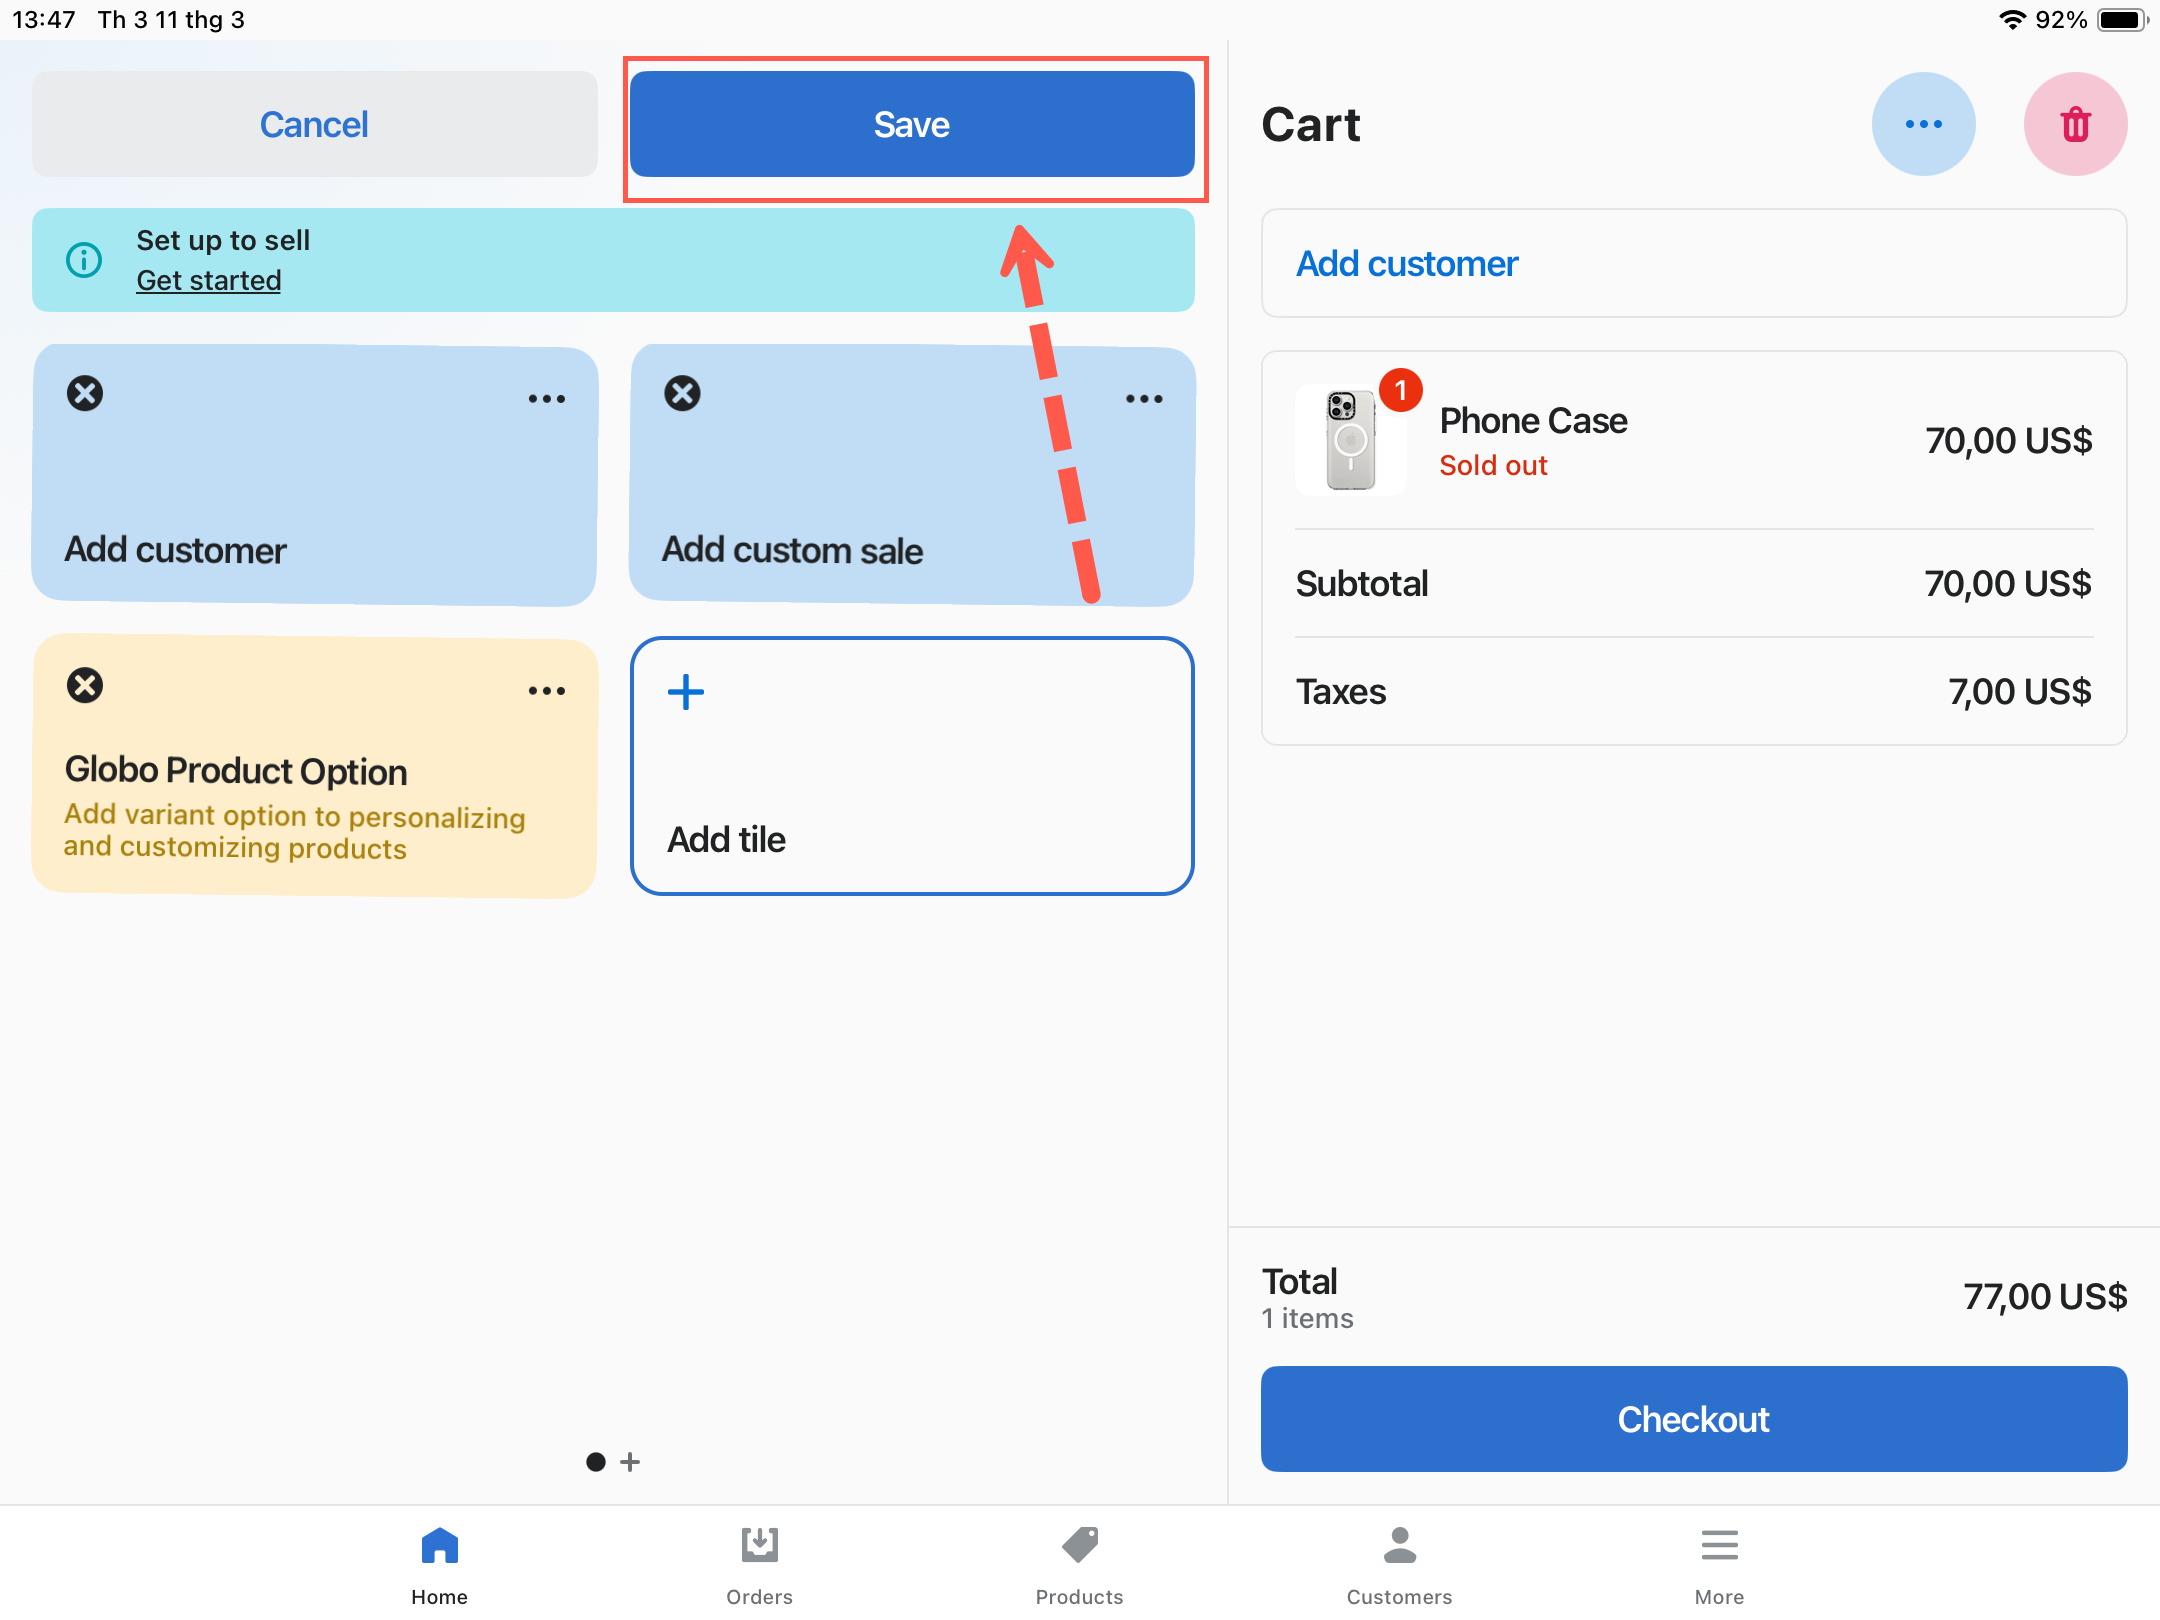
Tap **App website**, then the **Add** button.

<figure><img src="https://3141646361-files.gitbook.io/~/files/v0/b/gitbook-x-prod.appspot.com/o/spaces%2FkMyxhAk2ZlJa4wZQGfBI%2Fuploads%2Fgit-blob-ec69eccf9f9efe8c02d2f9f336d6e69bfc7610fa%2Fscreenshot-pos-app-website-add.png?alt=media" alt="The app panel in Shopify POS showing the App website tab with its Add button highlighted"><figcaption><p>Open the App website tab and add it as a tile.</p></figcaption></figure>

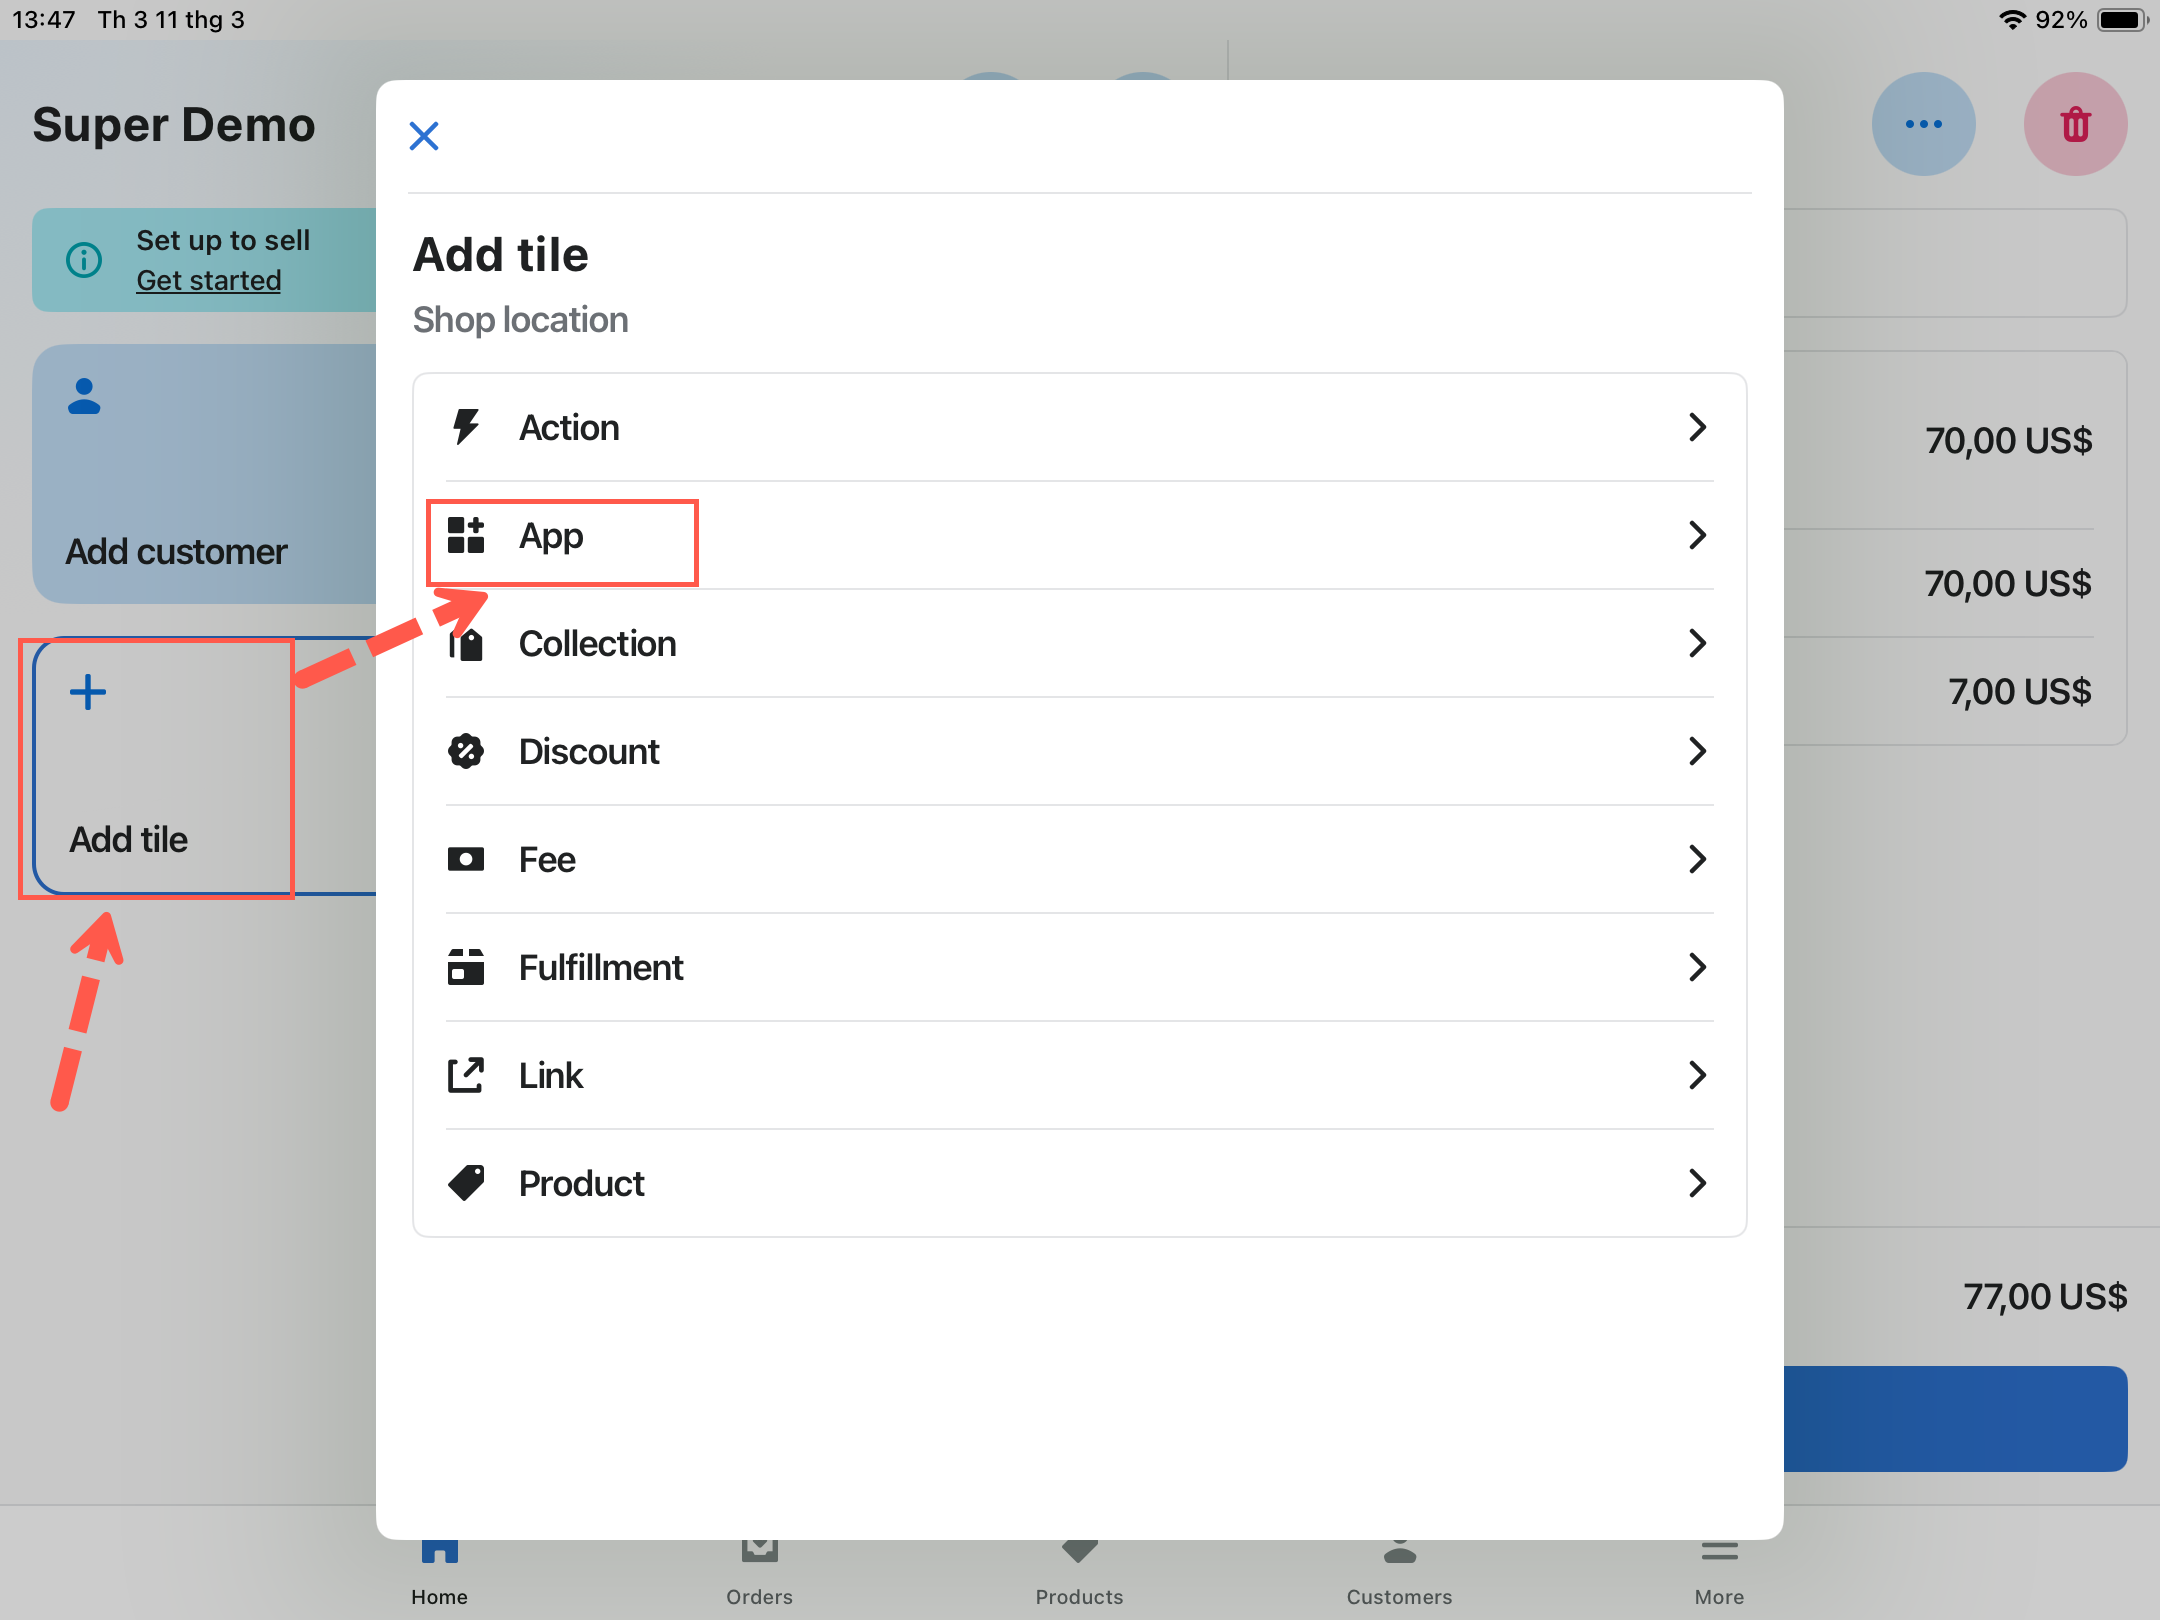
Tap **Save** to finish.

<figure><img src="https://3141646361-files.gitbook.io/~/files/v0/b/gitbook-x-prod.appspot.com/o/spaces%2FkMyxhAk2ZlJa4wZQGfBI%2Fuploads%2Fgit-blob-7ea24b6bd0b3e9ad0ae77f1ddf08903983cf8951%2Fscreenshot-pos-save-tile.png?alt=media" alt="The POS smart grid in edit mode with the new app tile in place and Save highlighted"><figcaption><p>The tile is on the smart grid once you save.</p></figcaption></figure>
{% endstep %}
{% endstepper %}

## Taking an order at the counter

{% stepper %}
{% step %}

### Find the product

Use the search bar on the POS **Home** screen. Enter a product name, a variant, or a vendor, and the matching products are listed below it.
{% endstep %}

{% step %}

### Add an in-stock variant to the cart

Select the variant the customer is buying. Add it the way your staff normally do.
{% endstep %}

{% step %}

### Open the app from the POS home screen

Tap the app's tile. It lists the items currently in the cart, under **Cart items**.
{% endstep %}

{% step %}

### Tap **Edit Options** on the item to personalize

You can select any item that has an option set available. You cannot select add-on items already in the cart, because they belong to the item above them.

If the product has no matching option set, the app says **No option sets are being applied for this product.** Check the option set's status, its **Sales channels**, and its product rule. See [POS limitations](/options/point-of-sale/limitations.md).
{% endstep %}

{% step %}

### Complete the options

The option form is displayed, using the same option set as your storefront. Fill in the required fields.

Add-on options are added to the cart as their own products, so the totals update as you go.
{% endstep %}

{% step %}

### Update the cart

The app confirms with **Cart updated**. Close the app to return to the POS home screen.
{% endstep %}

{% step %}

### Add a customer or a discount, if you need to

**More actions** in POS covers adding a customer, applying a discount, and the other order tasks. This is Shopify's own flow and is not affected by the app.
{% endstep %}

{% step %}

### Review the cart and take payment

Check the option details listed under each item in the cart summary, then tap **Checkout** and select the payment method. The options are stored in the order in the same way as online.
{% endstep %}
{% endstepper %}

## Practical advice

<table><thead><tr><th width="290">Do</th><th>Why</th></tr></thead><tbody><tr><td>Keep POS option sets short</td><td>A customer is standing there. A twenty-field form is not a counter experience</td></tr><tr><td>Use a separate option set for POS where the online one is long</td><td>Publish the long one to Online Store only, and a trimmed one to POS only</td></tr><tr><td>Prefer <a href="/options/option-types/selection-types/button.md">Button</a> and <a href="/options/option-types/selection-types/radio-button.md">Radio button</a> over dropdowns</td><td>Fewer taps on a touch screen</td></tr><tr><td>Set sensible <a href="/options/option-types/shared-settings/required-and-default-value.md#default-value">default values</a></td><td>Staff confirm rather than fill in</td></tr><tr><td>Give options obvious labels</td><td>Staff are reading them aloud to a customer</td></tr><tr><td>Train staff to open the app <em>after</em> adding the product</td><td>The app works from what is already in the cart, so an empty cart gives it nothing to edit</td></tr></tbody></table>

{% hint style="info" %}
Using two option sets is worth the extra setup. Your online form can ask for everything, while your counter form asks only for what staff need while a customer waits. Separate them with **Sales channels**: publish one to Online Store and the other to Point of Sale.
{% endhint %}

## What is stored in the order

The result is the same as online. The options are attached to the line item, and add-on products appear as their own lines, so your production team sees an in-person order in the same format as an online order.

See [Show options on orders](/options/storefront-display-and-design/show-options-on-orders.md).

## Notes

* The app must be opened from inside POS, because it reads the current POS cart.
* Add-on lines already in the cart cannot be personalized themselves, because they belong to the item they were added for.
* An option set published to both channels is shared, so a change affects both. Use separate option sets if you want them to differ.
* Country and customer rules apply to the storefront and are not useful for an in-person sale.